Monday, 28 May 2012

planting potatoes

One of my desert island foods is potatoes. I just love them - baked with the works 1950's style, scalloped with 5 year cheddar as an accompaniment to ham, sauteed in a heavy cast iron pan with onions, oven roasted fries with olive oil and sea salt, the first new potatoes quickly boiled and topped with butter. The list just goes on and on...

Quite often people think why bother to grow your own potatoes when they can be purchased so cheaply at the grocery store in August. But for me there's no comparison. The grocery store choices tend to be restricted to Kenebec, Chieftan, Yukon Gold (or even identified only as red, white and yellow).  There are so many heirloom and newly developed potatoes in all kinds of colours and shapes - some best for frying, others for baking, different ones best suited to boiling and then the ones like Yukon Gold described as "all purpose".

Additionally there is the issue of pesticides and herbicides. In conventional commercial farming potatoes have a heavier spraying schedule than any other vegetable and all that stuff is taken right down into the tuber we eat.

But I must admit I have spent a disproportionate amount of my life picking potato bugs. Normally I have planted potatoes on the weekend of Mother's Day but this year I delayed it a couple of weeks. I have heard from more than one source that delaying the planting could miss the first cycle of potato bugs so it seemed serendipitous that the newly tilled field wasn't ready to be planted in early May.

 Before planting I wanted to lay down black landscape fabric on the new bed in the field where the potatoes are destined to go. All the tilled weeds will add fertility if they break down but until then every tiny bit is a potential new weed plant. I hoped that the black tarp would smother or fry at least some of the weeds. Later the potatoes themselves should help clean out the bed. Between hoeing between the hills as the potato foliage grows, spreading cardboard between the rows and adding fall leaves I have been storing in the garage, the plan is that by the time the potatoes have been harvested the soil will have much more fertility and way fewer weeds! (But of course I don't need to be reminded of the "best-laid plans"!)
Black landscape fabric on part of the new bed 

The first step in planting potatoes is to lay out the seed potatoes. Inside the house they get at least some light for about a week and aren't too cold.
Seed potatoes laid out to green sprout

 Dark Red Norlands and French Fingerlings went on the counter on May 12. A week later the sprouts have turned green and they're ready to plant.
Dark Red Norlands with sprouts that have greened up

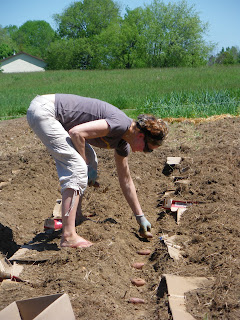
Diane helped me plant them. We dug trenches and laid cardboard between them. After we laid the potatoes in the trenches we hoed just enough soil to cover them. I checked them the next day to throw a little extra soil on any that were exposed.
Diane hoeing the trenches with a "mulch" of cardboard

Laying out the French Fingerlings
Then it was time to lay out the Banana fingerlings, Yukon Gold and John River Blue. They sat on the counter for a week and got planted in the bed which had been covered by the tarp in hotter weather. I decided not to lay down cardboard and just hope that the leaves I will add as mulch will suppress most of the tenacious weeds.
Banana potatoes after a week on the counter
We just finished the last of the 2011 potatoes so it's cold turkey for now. It's all an experiment - while I may have to wait a week or two longer than other years, I can hardly wait to grub around in the potato bed in mid July for those first delicious new potatoes.

building new stairs

It seems that the elements are really hard on a house in the country. There are always driving winds, raging rain, hot sun beating down and then violent swings between all those conditions. So there always seem to be maintenance projects waiting to be undertaken.

 By the time Avo and Christopher had finished building the deck and pergola almost twenty years ago they had kind of run out of steam for the stairs. Those steps were made using 2 x 10 treads and probably a 7 or 8" rise.  There were three risers. Apparently interior stairs generally have a 7 x 11 ratio (rise to tread) but 6 x 12 is recommended for deck stairs. So this time we decided to design a gentler rise with a more generous tread. We used two 2 x 6 pieces of BC red cedar for each tread. There are also four treads instead of three with a shorter riser.

The first step was to remove the old stairs.
One riser gone,  two to go

We decided, once again, rather than using joist hangers we would reuse the "header" we had used previously.
The ground is levelled, the flagstone laid

We had to measure the span so that we could carve out some grass, do some levelling and lay some flagstone to avoid wood/soil contact.
The outside stringers propped in place

Then it was time to attach the stringers to the "header" and attach the ensemble to the deck.
The electric drill makes screwing so much easier

We decided to use galvanized screws rather than nails to attach the risers to the stringers.
Starting to take shape

And now we're thrilled. They look much more elegant,  smell great and feel nice and solid. The perfect weekend project!
Scylla appreciates easy access from the deck once again


Monday, 14 May 2012

starting a new vegetable bed

We decided to put in a new bed in the field west of the pool. It is about 52 feet by 26 feet. Last weekend our farmer friend, Charlie, came over to till it. The soil is sandy loam so it was easier to till than he expected. But having been fallow for years it is filled with quack grass, twitch grass, milkweed, vetch and goldenrod. I am fighting despair when I think of all those chopped up weed roots, each of which just can't wait to sprout a whole new plant.
Charlie tilling the field for the new bed
Having consulted on exact dimensions Charlie gets back to work

We decided to have some permanent features so the north border will be a "hedge" of black and red currants and gooseberries. This weekend I planted three Red Lake Currants, three Wellington Black Currants and dug up two gooseberry suckers from our plant in the "white" bed.
Fledgling currants on the north border

The west border is now planted with raspberries; 10 Fall Gold, 12 Killarney  and about a dozen stray red raspberries from Charlie's patch. The Fall Gold were from a nursery and so had leafed out, the Killarney from another farmer who took them out of cold storage and of course Charlie's were suckers from his established planting. The Fall Gold looked the best at planting time, the ones in cold storage have yet to break dormancy and Charlie's were definitely looking less than happy at their change of address. But it will be interesting to see how things progress as the weeks go by.
Raspberries with a mulch of straw

I decided to transplant some self seeded sunflowers to form a border along the south side.

The other project this past weekend was to rake out a north/south path. We've put down a black tarp to try to kill off some of the weeds so the east/west path will have to wait until we lift it in a couple of weeks in preparation for planting.
Black tarp and the outlines of the north/south path

The plan is to put potatoes (French Fingerlings, Banana, Yukon Gold, Dark Red Norland and John River Blue) in two of the quadrants. I think I will put down cardboard between the rows and mulch with bags of leaves I saved from the fall in an attempt to foil the weeds.

One other quadrant will be summer and winter squash. I'll make hills of manure and compost plant the seeds in and then lay cardboard between the hills. Between the cardboard and the squash's huge leaves that will be the strategy to foil the weeds in that section.

 And the final quadrant will have the bush and pole beans to add some nitrogen to the soil and build up the fertility.

Monday, 7 May 2012

finally seasonal weather

After the non-winter we have had and then a week of summer in March it's nice to be back to seasonal weather. Which means of course the temperature gyrates up and down and it's sunny and tropical feeling one day and cold and damp the next. But the plants are happier for it and we sowers of seed can relax a little.

For the first time I sowed spinach seeds in the late fall hoping to have an early spring crop. They germinated in the fall and then were very happy under the snow all winter. But then the tender emerging leaves were fried by the week of temperatures in the 20's in March. But with some rain and a warm, not scorching sun, the little plants have put on lots of healthy growth. The leaves are perhaps a little more muscular than their spring planted counterparts but it is a real thrill to be harvesting spinach in late April right out of the ground.
Fall seeded spinach

The new leaves of the ancient rhubarb we inherited were also scorched in April but, like the spinach, the new leaves are green and the stalks vigorous and healthy.
Rhubarb

It's been about a month since the first sowing of peas and spinach and they are starting to put out their secondary leaves. The second planting a week later has also emerged but with just the primary leaves so far. And the first fava beans are breaking ground. Sometimes successive plantings don't work exactly as planned and later sowings emerge from the warmer soil sooner and catch up with their older siblings. But generally successive sowings seem the most successful, not because they ensure successive cropping, but because weather is unpredictable. Sometimes soil and air temperature and precipitation all conspire to make  perfect conditions and one sowing remains the most successful for the whole season. This happened with my beets last year - I did 3 different plantings but only one produced great results - even though it took three months for that to be obvious.

A couple years ago when our house in the city was being renovated I couldn't grow seedlings in the basement under grow lights as had been my habit. So circumstances required a few changes. I decided to try them in the unheated east facing porch at the farmhouse. It turned out to be a great success and is now my method of choice. In the city we have a vintage Moffatt gas stove whose pilot lights are on all the time. This gives just enough constant gentle heat to encourage seeds to germinate. The flats are enclosed in a plastic dry cleaning bag and it makes for perfect germinating conditions. The next step is to free them from their plastic cocoon and put them in our south facing bedroom window until the secondary leaves appear. At this point they make the trip to the porch at the farmhouse where the cool temperatures and morning sun seem perfect. It also guarantees that I don't hover like an anxious mother, watering too much or too often or just generally getting in their way.
The wasps seem to love hiding in the big leaves of the castor beans 

So the porch is now filled with tomatoes; little cherry, pear and currant heirlooms, full size heirlooms and a few hybrids. I usually start about 75 plants because it's hard to predict how many I'll lose to cutworms and which ones will do the best in the weather the summer brings. Cohabiting with the tomatoes are also 5 types of peppers, ornamental Japanese corn for the pots, castor beans, lavender and basil.
Seedlings  in the porch
Because the lettuces I plant are open pollinated and I allow at least some of them to bloom and set seed in the late summer I always have a few self seeded volunteers. These seem to germinate where circumstances conspire to provide perfect conditions and then I prick them out and plant into nice orderly rows in the salad greens bed. They are always so robust and healthy - enough to make one cautiously optimistic.
Transplanted self seeded lettuces with a mulch of grass clippings

We find the season is about three weeks behind up in the hinterland so the crabapple allee there is about to burst into bloom just as the crabapple in the city has lost most of its blossoms.
Crabapple in full bloom a couple weeks ago in the city with redbud in the back ground